|
Making
Pretty Images
Masking
Functionals
1)
Run 3dAutomask on the preprocessed spiral image to make the mask:
>3dAutomask
study1_norm+orig
The
result will be a fim image (typically 64x64xnas). Afni will name
it
automask* by default and treat it as a functional image (You will
use this image to mask out data floating around outside the brain).
>afni
Display
the high resolution anatomical image, choose "See Function"
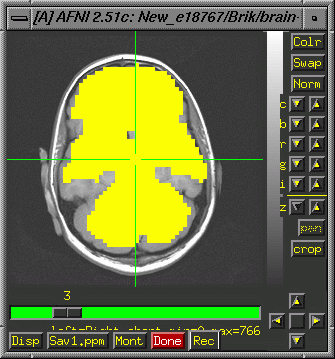
and select your automask. It will look something like this (See
Masking page for more information about
masks):

2) Apply the Binary Mask to a Functional File:
>3dcalc
-prefix calc_out -a study1_norm+orig -b automask+orig -expr 'a*b'
Here
you are masking out bogus data floating around outside of your yellow
mask. In
this expression, we multiply the original epan image (study1_norm+orig)
by our
mask (automask+orig) and generate calc_out+orig. calc_out+orig is
the cleaned up file that we will use for clustering and eventual
presentation.
Better
Clustering
You
have a lot of control over your cluster size
during data set clustering.
You can choose more stringent (larger) values for the clustering
volume. This will help if you have a lot of little clusters and
you would prefer fewer large clusters. 3.8 should still be fine
for the radius. (Bigger values would be problematic as they would
allow non-contiguous voxels to be treated as neighbours). Think
carefully about this during analysis so that your output images
are what you want for presentation.
Smoothing
the Activations
Caution:
Before you run 3ddup on your functional BRIKs, you must
make sure that an appropriate resliced anatomical BRIK, and only
that BRIK is
available as a parent in the same directory.
>3ddup
-prefix study1_dup study1_block80_norm_p05_150ul+orig.
The
above command runs 3ddup, naming the output study1_dup. It uses
study1_block80_norm_p05_150ul+orig (from the Finished Afni Tutorial
Data area)
as the input. This creates a HEAD file only. Now start afni:
>afni
- Click
the "Define Datamode" button.
- Choose
"Write Many" in the lower right panel and select
the file you just created with 3ddup (study1_dup).
- If
you choose "Anat resam mode: Cu", the resultant
activations will be interpolated and have their square edges removed.
(Choose "Anat resam mode: NN" [Nearest neighbour] if
you want the activations to look just like the originals.)
- This
creates the BRIK to go with the HEAD. Close and restart afni and
then display your original activations and the study1_dup file
to make sure they look the same (or at least very similar). Note
that afni seems to have some trouble refreshing the images correctly
which can be a little confusing. You may want to check images
several times and perhaps close and open afni or move some images
to a different directory to be sure you've got what you want.
Exporting
an Image from Afni
The
following steps assume that you want an image in which the clustered
functional image is overlaid on an appropriate anatomical image.
If you want to print something else, you'll need to make different
choices.
Open
AFNI in the Exam area of interest.
>afni
- Switch
Anatomy Select a brain image (anat...not epan)
- Switch
Function Select a functional image, (usually clustered at p05
or p01).
- Define
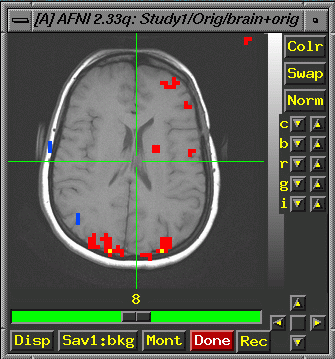
Function Correlation slider must be set to ~p=.06 (In other words,
to see all the clusters in your image, the correlation slider
must be set to a less stringent p-value than the value you used
to create the cluster. If it is set too low, then some clusters
might not display). Set color display appropriately.
- You
will probably select an Axial Image. When the image comes up,
choose the appropriate slice with the slider under the image.
Usually you'll want the green crosshairs turned off (Xhairs in
the upper left of the afni window).

- On
linux (or another unix machine with the proper underlying software)
you can press the "Disp" button on the lower
left of the displayed Afni image and change the output format
to jpg or tiff (etc. etc.). On sgis you may be stuck with *.ppm
as an export format (But try pressing "Disp" and see
if you have other options).
- Use
the c (contrast) and b (brightness) arrows on the
upper right of the afni image display window to change the contrast
and brightness so that the background is a pleasing solid black,
but the brain image still looks nice.
- If
you would like to export a montage of image, click the "Mont"
button at the bottom of the afni image viewer and decide on the
montage you want.
- Choose
Sav1:*. Name the slice using some appropriate strategy
(e.g. the patient's initials, condition and slice). These image
files are (typically for the sgi) *.pnm files and are saved to
the directory in which afni was originally opened....even if you
have multiple sessions running.
SGI:
Media Convert
- Choose
Find from the toolchest => Media Tools => Choose the "Media
convert" program from the option icons.
- Use
the gui interface to select the input file (Choose "File"
from the upper left hand corner. Choose "Select input file").
- Under
"Output Media" on the right, Choose "Image Files".
- Set
the output file type to tiff (in the 2nd column of options list).
- Check
the path and name of the output file and click "start"
(If you intend to tranfer the image files to a PC running Windows,
you may want to choose short names, 8 characters or fewer followed
by .tif. (Unix machines may use *.tiff which your PC may or may
not be able to handle). Longer names can sometimes be shortened
in the transfer process, resulting in confusion and frustration
for you at the other end)
xv
(Available on Buddy, Holly and Merlin)
Make
sure you are in the directory where your images are (this isn't
strictly necessary, but will make life easier).
>xv
- Right
click on the fishy image that comes up when xv starts.
- On
the interface that pops up: Choose "Load".
- Browse
for your image and select it. Close the loader (if it isn't already
closed), and click "Save".
- An
interface pops up. In the upper right, use the drop down menu
to browse for the image format you want and choose it (tiff).
- Name
your file in the text box at the bottom and click okay.
- If
you want to, choose "Load", then browse for and load
the image you just created to make sure the process worked correctly.
Get
tiff files with scp from any pc. Note: *.tiff will be shortened
to *.tif under Windows. Sometimes names will be shortened to 8 characters
followed by .tif. You may wish to use short names to avoid confusion.
See ssh and scp.
|


