|
10/25/2006: The newest linux machines (Fedora Core 5) will
support cd and dvd writing. When you insert a new empty piece
of media, a window comes up where you can drag files...when
finished, a menu on the window allows you to burn to the media.
Root permissions are no longer needed....for older systems, I have
left instructions below.
Overview:
CD_record on Unix
du
-ks: Put the stuff you want to burn into a directory and check
that the directory is not to big.
mkisofs:
Create a cd_image*: convert a directory into a file that is formatted
in ISO-9660 format (CD format)
cdrecord:
Write that cd_image to the cd in the cd writer.
*By
"cd_image" here, we mean a file, formatted in ISO-9660
format, and created from a directory of stuff to go on the CD. This
file looks exactly like a CD to the system (i.e., it is in CD format)
even when it is still sitting on the HD. In no way does "image"
in this context refer to the content you are putting on the CD;
that could be programs, pictures, spreadsheets files, whatever.
Step
1
You
can use du -ks dir/ to determine the size of a directory in kilobytes
and then move the directories you want into a single temp directory
(I called mine Burn/). e.g.,
>du
-ks Burn/
Don't
exceed 620 Megabytes (620,000 k) total as a CD can hold 650 Megabytes
and needs some overhead space for the filesystem.
Step
2
>mkisofs
–r –o cd_image dir/
(make
an iso filesystem file in this directory whose name is cd_image
and which is a copy of the directory /dir). You need to be in the
directory right above dir/ for this to work.
For
example,
>mkisofs
–r –o bigiso9660file Burn/
would
work just as well if you wanted the cd image file to be named bigiso9660file
and contain a copy of the contents of the directory "Burn"
.
Note
that you cannot list more than one directory as an argument to this
command, though you can have lots of subdirectories inside dir/.
Check
to make sure that mkisofs has done a good job by calling isoinfo
to list the contents of the resultant iso-formatted file:
>/usr/freeware/bin/isoinfo
-l -i ./bigiso9660file
Step
3
Put
a CD into the CD Writer -bluish side down.
>cdrecord
–v speed=4 dev=1,6,0 –data bigiso9660file
Record
a cd –v (with verbose output-so it tells you everything
it is doing) at speed 4 (I have tested speed 2 and speed
4, both work fine…others may work as well), on the device with
the scsi address 1,6,0 and use the data file called
bigiso9660file as the content of the cd.
It
took me about 14 minutes to burn 500+ Megabytes at 4x speed.
Useful
Tips
One great way to reduce the size of a directory without tarring it
up, is to gzip all the files individually. Of course, this can take
a long time if you do it manually, so here is a useful find command
that will gzip everything in the current directory and below (make
sure you are in the right place before you run it).
First,
you might wish to do a fake run of the command, to find out what
it will do (use the -ok flag instead of the -exec flag)
So
here is the fake run version:
>find
. \! -name '*.gz' -ok gzip -v {} \;
And
here is the real version:
>find
. \! -name '*.gz' -exec gzip -v {} \;
Note
that this won't zip up directories, just the files inside directories.
It'll warn you that it can't zip up directories (that's fine).
Writing
CDs on Mrisun or Tommy
The
new mrisun is a linux machine with xcdroast installed. Follow these
instructions to write a cd using xcdroast:
-
Place your CD in the drive, and log in. "guest" will
not be able to log in; so, use "cnl", or your personal
account.
- Xcdroast
has a nice interface for writing CDs. From the
command line (use the foot icon on the Gnome menu bar to open
a terminal window, or click the little icon that looks like a
monitor with the foot on it [a couple of icons to the right of
the foot icon], or from a remote Xsession),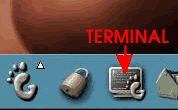
In the terminal window, type:
>xcdroast
If this is the first time this user has launched xcdroast, it
will
complain of no setup file. Hit the "enter setup" button,
and then "save
configuration". the defaults are all set up, so you shouldn't
need to
change anything, and you won't see the setup again (unless you
select it).
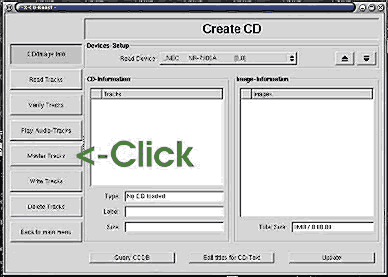
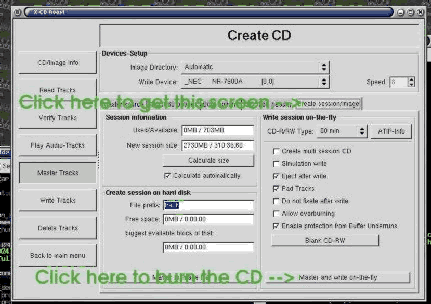
- You
should now be at the main menu. Press "Create CD".
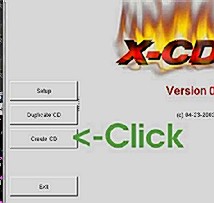
Then press "Master Tracks".
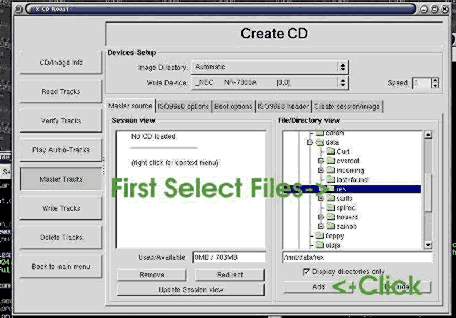
- Under
"File/Directory View" (on the right) you can navigate
to what you'd like to burn (/data2/cnl would be common). By default,
you can only add directories. Uncheck the "Display directories
only" box below the File/Directory View to see files as well.
Select Files or Directories, pressing "Add" to add them
to your CD. You can do this multiple times, so you don't have
to select everything at once.
- The
files and directories you've chosen should appear in your "Session
View" (on the left). The "Size" on "Used/Available"
(below the Session View Window) will not update yet.
- Once
you are done adding files, go to "Create Session/Image"
on the last windowpane tab. Hit "Calculate Size"(under
"session information" on the left). Hopefully it is
less than your CD size. Go back to the "Master Source"
tab and remove files if it isn't.
- Double
check the defaults, and hit "Master and Write on-the-fly"
to burn your cd.
- Once
the cd is done (xcdroast should tell you that it wrote the cd
correctly), you can exit xcdroast. Sometimes, xcdroast mounts
the CD, so you can't just press the CD tray button and remove
your cd. If the CD icon appears on your desktop (probably on the
lower left), then the cd was auto-mounted. Right click the cd
icon, and choose "eject volume". Or, you can type "eject"
from the terminal command line.
- You
should always check your cd and make sure it is readable on another
machine.
If you are adding files or directories with long names, you may
have problems reading those long names on another operating system
(we've seen the problem reading cds on unix that were written
on Windows and vice versa). Short names are always better.
That
should be all...
|